Super Easy Mickey Mouse Scrapbook Layout in 10 Minutes
We're going to have fun with a super-simple Mickey Mouse scrapbook layouts design today!
I've been looking at disney scrapbook layouts for months now, saving ideas to Pinterest, and of course, watching Disney movies with the kids in the name of research.
I've been looking at disney scrapbook layouts for months now, saving ideas to Pinterest, and of course, watching Disney movies with the kids in the name of research.
But having grown up with Walt Disney's most iconic cartoons on the television when I was a kid, I really wanted to create a Mickey-inspired scrapbooking layout for my first in what is hopefully many, magical Disney scrapbooking pages.
This particular Disney scrapbook layout idea was inspired by a Mickey Mouse layout sketch in the fantastic book, 525 New and Advanced Scrapbooking Sketches Volume 2. This book is amazing for scrappers block!
This particular Disney scrapbook layout idea was inspired by a Mickey Mouse layout sketch in the fantastic book, 525 New and Advanced Scrapbooking Sketches Volume 2. This book is amazing for scrappers block!
Table Of Contents:
1. Creating The Elements
2. Cut The Silhouette
3. Self-Adhesive Photo Corner
4. Setting The Background
5. Experiment With The Elements
6. Finished Layout
1. Creating The Elements
2. Cut The Silhouette
3. Self-Adhesive Photo Corner
4. Setting The Background
5. Experiment With The Elements
6. Finished Layout

A super easy Mickey mouse themed layout that your kids will surely enjoy!
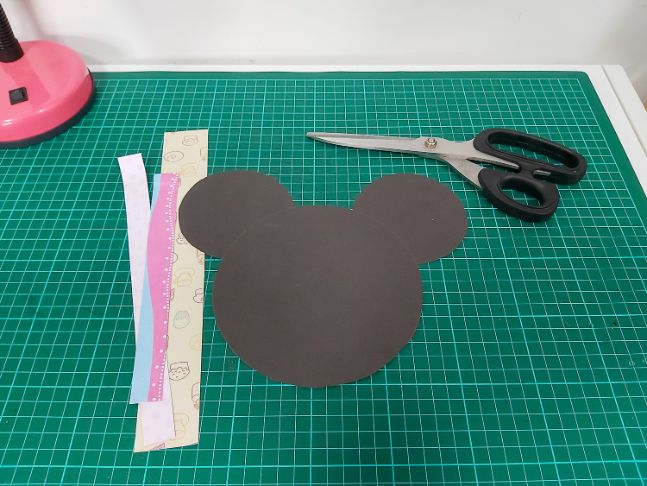
Okay, let's start creating the elements for this layout. We will need a magical Mickey Mouse head silhouette, some strips of colored and/or plain cardstock, a plain colored background, and of course, a treasured photograph that you have printed out.
Begin by creating the iconic Mickey head silhouette. You will need to draw three circles, a larger one for the head and two smaller ones for the ears.
Begin by creating the iconic Mickey head silhouette. You will need to draw three circles, a larger one for the head and two smaller ones for the ears.
I chose to use matt black paper for the silhouette in the final layout but I actually cut out three in different colors before I settled on black.
You could use a compass circle pencil marker to make the circles on the paper but it's just as easy, if not easier, to draw around anything that has a circular shape. I used a Tupperware lid for Mickey's head and a roll of painter's tape for his ears.
Want to learn more fun and exciting layouts for your scrapbook page? Click here and discover more amazing layout ideas!

It's easy enough to just eyeball where you think the ears should go. Once you have drawn your three circles, it should now be recognizable as the iconic Mickey shape and should look a lot like this.

Go ahead and cut out your silhouette using either scissors or a crafting knife. I recommend using a crafting knife as it results in a smoother finish. You will also want to rub out any leftover pencil marks on your silhouette.
Now go ahead and create some strips of paper. I used this opportunity to use up some scrap pieces and actually made more than I needed, confident that I would use them in another project at a later date.
Now go ahead and create some strips of paper. I used this opportunity to use up some scrap pieces and actually made more than I needed, confident that I would use them in another project at a later date.
Make sure the strips of paper are different widths and lengths. Mine vary between 0.6 to 1.2 inches wide, or 1.5 cm to 3 cm wide.
This is a great way of making use of your scrap papers!
See, you don't always have to shop for embellishments! I only ended up using 6 strips in the final piece so you shouldn't need more than around 10 strips. Once you have a small stack of strips in fun colors, it's now time to prepare your treasured photograph.
I chose a photograph of my son wearing some home-made Mickey ears which we had fun making over the last school holidays.
I chose a photograph of my son wearing some home-made Mickey ears which we had fun making over the last school holidays.
We had planned an epic vacation to Magical Disneyland in California but as that international travel is off the cards at the moment and alas, Australia has no Disneyland, we made do with a Disney crafting, movie, and baking day at home.

Of course, this step is purely personalized and you may decide to adhere it straight onto the page as is with no preparation required. I mounted my picture onto a cream-colored background using self-adhesive photo corners to add character.
Given the darker section in the background of my photograph, the lighter-colored border helps the picture stand out a little more against the dark silhouette on which it will sit.

Photo corners will help make your photos pop out!
Now for the final element, make sure to grab your cardstock background. I have chosen a 12 x 12 simple sky blue colored background to tie in with my son's blue shirt. Although you can't see it in the photograph, the background is slightly textured with lines running horizontal across the page.
Congratulations, you have finished gathering your elements and can start putting the Disney Mickey Mouse scrapbooking layout together.
Congratulations, you have finished gathering your elements and can start putting the Disney Mickey Mouse scrapbooking layout together.
The elements should now look a little something like this, although you will most likely be using different colors and patterns.

Go ahead and start experimenting with the elements in your background. I stuck down the silhouette fairly early on but re-arranged the strips and the photograph quite a few times before I was happy with the result.
As you can see, I have more strips that I needed but the extras were just placed back into my scrap stash for another project.
As you can see, I have more strips that I needed but the extras were just placed back into my scrap stash for another project.

Move around your elements until you find a placement
that you like before applying adhesives!
that you like before applying adhesives!
Although I experimented with different angles for the strips, I settled on a design that was very close to my original inspiration, the Mickey Mouse layout sketch I mentioned earlier that can be found in the book 525 New and Advanced Scrapbooking Sketches Volume 2.
Here is the final Magical Disney page. See, I told you it was super simple!
Here is the final Magical Disney page. See, I told you it was super simple!

A simple DIY Mickey mouse layout using strips of scrapbook paper and plain cardstock!
Try this layout on your own and see what magic you can create with this Disney scrapbooking layout idea. You could easily convert the silhouette to Minnie Mouse with the addition of a bow and a different color scheme for a new magical design.
If you want to see some more disney related scrapbook pages, then check out this article about disney princess scrapbook layouts.
Share this around with your friends! See you next time. Happy scrapping!
Share this around with your friends! See you next time. Happy scrapping!

OUR BEST SELLING BOOKS


HERE'S SOME OTHER SCRAPBOOKING ARTICLES THAT YOU MAY FIND HELPFUL
The Top 5 Scrapbooking Tools That Are Proven To Help You Create Better Layouts
12×12 Scrapbook Layouts Tips You Should Never Miss!
5 Tips To Creating Catchy Scrapbook Titles For Your Layouts
TOP 5 Scrapbooking Ideas I LOVE!
How to Scrapbook: The Ultimate 'Learning How to Scrapbook for Beginners'
Scrapbooking Tips: 10 Tips To Help You Create Even More Enchanting Pages!
5 Simple Scrapbook Organization Ideas and Tips!
Scrapbook Stores Online: Shop from the Top 7 Best Craft Stores


