Here's Some Stunning High School Scrapbook Ideas!
Wait! Now That You Have A Theme For Your Page, Then You'll Need To Know Which Layout To Use....Let Me Show You...
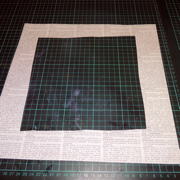
2. Using the centre piece that was just cut out of the newsprint paper, trim 3 of the four edges with a paper trimmer. I cut mine down to fit my 5×7 photo on it as a large mat but I also left extra on one side. I also tore down the left side.
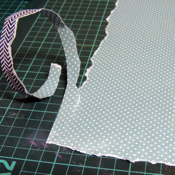
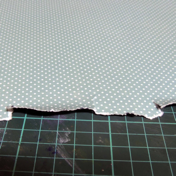
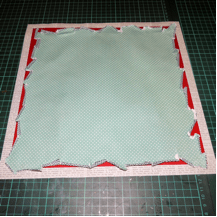
3. Next, using the Navy Chevron paper, tear along all four edges.
4. Make little tears along the edges tearing down into the paper by approximately ¼ inch.
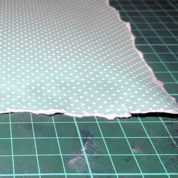
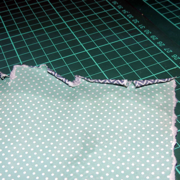
5. Spritz the edges of the paper so that it is visibly wet, especially on the torn edges. This will make it easier to set the distressed edge.
6. With your fingers, start at the first of the torn edges parts and roll it up, don't worry if it tears a bit as this adds to the overall distressed look. A good tip is to only do one side with the water then rolling at a time so that the last edges isn't dry before you can get to it. Once finished, put it aside somewhere flat so that it can completely dry.
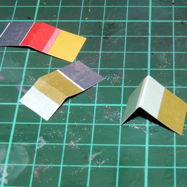
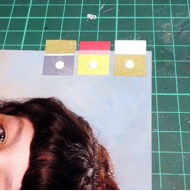
7. Using the Everyday Moments paper, Cut out one of the long arrow bands (I cut out the red one) and put aside. One the other side, find the notecard that has a band of striped colours along its top and cut it out. Cut this into three sections and fold each in half to make 3 tabs.
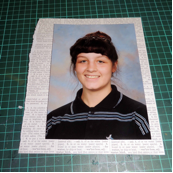
8. Attach each of these tabs to the top left edge of the photo using a brad pierced through the centre of the coloured square and through the photo.
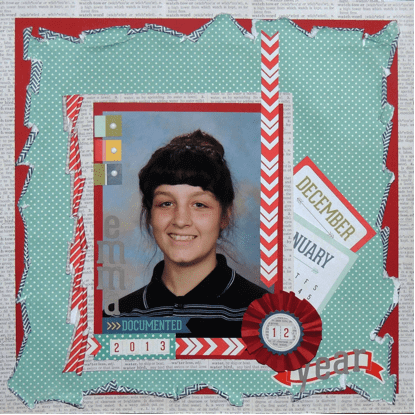
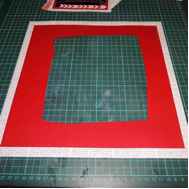
9. Next, cut a 1 inch strip from the top and left side of the red cardstock to make an 11inch square. Put these strips aside to use later then cut the centre of the red cardstock the same as earlier. Adhere the red 'frame' to the centre of thenewsprint. You will still have a huge hole in the centre of your page at this stage but its going to be covered up soon – promise!!
10.Trim the centre piece of the Newspaper print paper (Red Stripe Paper) so that it measures 1 inch wider lengthways and another 3 inches wide, width-ways. Tear down approximately 1 inch from the longer side so that you have a photo mat size piece and a strip of patterned paper then curl the torn edges as seen in the photo.
11. Trim the centre square of red cardstock so that it measures 5 ½ inches by 7 ½ inches and adhere photo to the centre of it. Attach this to the curled Newsprint paper then attach the strip under the edge to create a double curled edge.
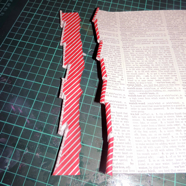
12. Attach the two red cardstock strips together to make a long strip. Trim to 14 inches long then accordion fold (mine was approximately ½ inch wide folds).
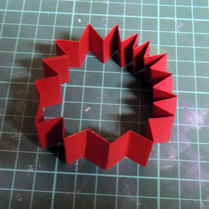
13. Attach the ends of the cardstock together to create a kind of accordion folded tube.
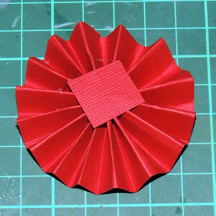
14. Cut out a scrap of cardstock and put to the side, ready to use in a second. Gather all the edges of the folded tube you just made and gently push them down, allowing the edges touching your work surface to spread outwards. Push down and your rosette will begin to appear. While holding it in place, add plenty of glue to the top of that scrap of paper you put to the side then quickly put it on top of the rosette and hold in place until the glue has dried.
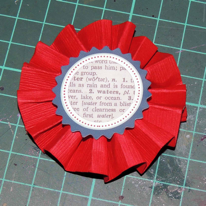
15. Flip the rosette over and add more glue to the centre of the rosette then top it with the scalloped circle sticker from the Elements sheet. Finally add the small Newsprint circle sticker to the centre of that.
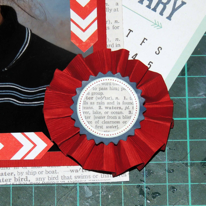
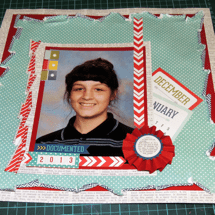
16. Remember that arrow strip that was cut out at step 7? Cut it into two pieces, cutting the edges so that they have a chevron edge then attach along the right side of the photo and the bottom edge, pointing towards the bottom right corner. Place the Rosette at the centre of this corner so that the chevron strips are pointing towards it.
17. Add stickers to the bottom left edge of the photo as shown in the photo. A great strategy for personalizing stickers is to add stickers over the top of other stickers – just like I did for the centre of the rosette.
18. Now its time to finally begin pulling this whole page together. By now the paper that we began by curling the four edges of should be dry so its time to adhere it over the top of the red cardstock, making sure that some of the red is peeking out here and there along each of the sides.
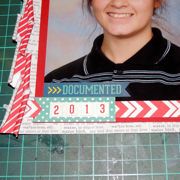
19. From the Calendar paper, cut out the months of January and December and arrange the at the side of the photo mat, just behind the rosette so that they peek out. I chose to use those two particular months because they are the months that school ends and begins for children in Australia. Attach the whole photo mat to the centre of the page as shown in the photo.
20. Finally, time for the finishing touches!! I added my daughters name along the left side of the photo, vertically to draw your eye down and around to the rosette.
21. Add the red banner sticker below and the rosette and add the word 'year' using the grey letter stickers found on the Elements Sticker sheet.